The cosmos has always captivated humanity, and one celestial wonder that never fails to amaze is the Orion Nebula! Nestled within the Orion constellation, this stellar nursery is a stunning spectacle of gas, dust, and celestial winds – a breathtaking beacon of the winter sky!
Situated in the sword of the Orion constellation, the core of Orion is a stellar nursery where new stars are born amidst swirling chaotic clouds of gas and dust. At only 1,344 light-years from Earth, the Orion Nebula makes an ideal target for astrophotography, even for those just venturing into the captivating realm of capturing the night sky.
The core of the nebula is a stellar nursery where new stars are born amidst swirling clouds of chaotic dust and gas. These energetic stars exceed 30,000 degrees Celsius, and ionise Hydrogen & Oxygen gas to emit a brilliant glow in optical and infrared wavelengths – if you look closely enough, you can even see some of these baby stars right at the beginning of their life – stars that will shine for millions of years after we’re all gone.
Photographing the Orion Nebula is almost a right of passage for astrophotographers. It offers a chance to capture not just the cosmic beauty that lies thousands of light-years away, but to witness the creation of new stars right before your eyes!
Image details
Camera: ZWO ASI 294 MC Pro
Telescope: William Optics 73 Apochromatic Refractor
Mount: ZWO AM5n Harmonic Drive Equatorial Mount
Filters: Optolong L-Pro Broadband Filter
Exposure: 8 hours total integration time (60 second exposures)
There’s something truly awe-inspiring about capturing the Andromeda galaxy in a photograph. The sheer scale and beauty of this celestial wonder can leave anyone breathless, and photographing it can be a truly rewarding experience. The Andromeda galaxy is located a staggering 2.5 million light-years away from Earth, making it the closest spiral galaxy to our own Milky Way. With swirling arms of stars and dust that span over 220,000 light-years across, it’s been a source of inspiration for astronomers and photographers alike, and capturing it in a photograph can be an experience like no other.
Messier 31 – The Andromeda Galaxy
For years I have looked at such photos in absolute awe, thinking they were taken from telescopes in orbit. I had no idea it was possible to capture images of the universe from home, let alone my back garden. The image above is made from data collected over two years: Summer 2021 and 2022. Located in the Andromeda constellation, this galaxy is best photographed between September and February.
Processing
This image was processed using Pixinsight – a dedicated image processing suite for astrophotography. The tools available in Pixinsight are tailored to bring out faint details in astro-photographs and are made to do so in a way that is easy to use, but granular and controllable.
Within Pixinsight, the Weighted Batch Pre Processing tool was used to ingest the sub-exposures and calibration frames for each night. WBPP then performs the stacking process, and also performs heavy analysis on each frame to only stack those of the highest quality (based on star size, star count, contrast etc..). WBPP also performs cosmetic corrections on each frame to handle any hot pixels, as well as performing kappa-sigma clipping (the removal of airplane and satellite streaks across certain sub-frames).
An initial background extraction was done to remove any gradients, followed by colour calibration, de-noising, and removal of the stars.
The galaxy was then stretched and processed separately from the stars, allowing for faint dust lanes and nebulosity to be revealed without blowing out the shape and colour of the stars. The range selection tool was used to create a mask to isolate the galactic core from the outer dust lanes. The stars were then recombined, with a few final touches in Adobe Camera Raw.
Object type: Spiral galaxy
Other names: M31, Messier 31, NGC 224
Constellation: Andromeda
RA (right ascension): 00h 42m 44.3s
DEC (declination): +41° 16′ 9″
Magnitude: 3,44
Angular size: 178 × 63 arcmin
Age: 10 billion years
Locked onto M31 – Circled in Red
Captured using an iPhone 12 Pro, the Andromeda Galaxy can be seen circled in red. From Earth, it looks like nothing more than another star in the sky. Pay a little more attention and you may be able to make out some airy whispers of its galactic disks. But the power of astrophotography allows us to see it an all it’s beauty and power.
HDR Exposures
M31 is notoriously tricky to photograph. The long exposures used to capture the galaxies discs and dust lanes often blow out its core, resulting in poor colour and lost details. To truly capture the galaxy in all its beauty, an HDR approach should be taken. This involves combining exposures of multiple lengths. In this case, I used the following exposures and equipment:
Telescope: William Optics Zenithstar 73 Apo Refractor
Mount: EQ5 / EQ6-R Pro
Camera: ASI 294 MC Pro
Exposures: 10 hours total: 8 hours x 2 mins & 2 hours x 30 seconds.
Tips and Advice
The Andromeda Galaxy is large – very large, almost the size of 4 full moons in the night sky. The target is best suited for a wide-field refractor, around 500mm or less.
You can capture this target with a simple DSLR and lens. The object is so large that you may not even need a star tracker. Simply adjust the camera’s position to keep it in the field of view every few exposures.
Dark skies help a lot. If you can, try and travel to darker skies to capture your images. The less light pollution in your sub-exposures, the easier it will be to pull out the faint details around the outer dust lanes of the galaxy.
When processing your image, make sure to use layer masking. This process involves masking off certain areas of the galaxy so they aren’t over blown whilst highlights are teased out in the darker parts of the image – something very fitting for a target with such high dynamic range.
Photographing the Andromeda galaxy is not just about capturing a beautiful image, though. It’s also about the sense of wonder and awe that comes from contemplating our place in the universe. Looking at a photograph of the Andromeda galaxy can remind us of the vastness of space and the infinite possibilities that lie beyond our own planet.
In a world where we’re often consumed by the day-to-day stresses of life, photographing the Andromeda galaxy can be a powerful reminder of the beauty and mystery that surrounds us. It can inspire us to explore new frontiers, both in space and in our own lives.
So, if you’re a photographer or an astronomy enthusiast looking for a new challenge, consider photographing the Andromeda galaxy. It may require some effort and patience, but the end result is a truly inspiring image that can remind us of the limitless possibilities that exist beyond our own world.
The Heart Nebula is a stunning astronomical object that has captured the hearts of stargazers and astrophotographers alike. This beautiful nebula is located in the constellation Cassiopeia and is named for its distinctive shape, resembling both a romantic and anatomical heart.
At the center of the Heart Nebula lies a cluster of young stars that are illuminating the surrounding gas and dust. These stars are believed to have formed only a few million years ago, making them relatively young in astronomical terms. Their powerful radiation is causing the gas and dust to glow in a brilliant display of pink and red hues.
When I first started my astrophotography journey, I knew that the Heart Nebula was the first object I wanted to photograph. Faint, low in the sky, challenging to process – but I’d made up my mind. I had a long love for astronomy for years, and there was nothing more fitting for my first attempt.
Since then, I have come back to Heart several times, each time collecting more data, and improving my image processing skills. Below is my latest attempt at IC1805 – The Heart Nebula.
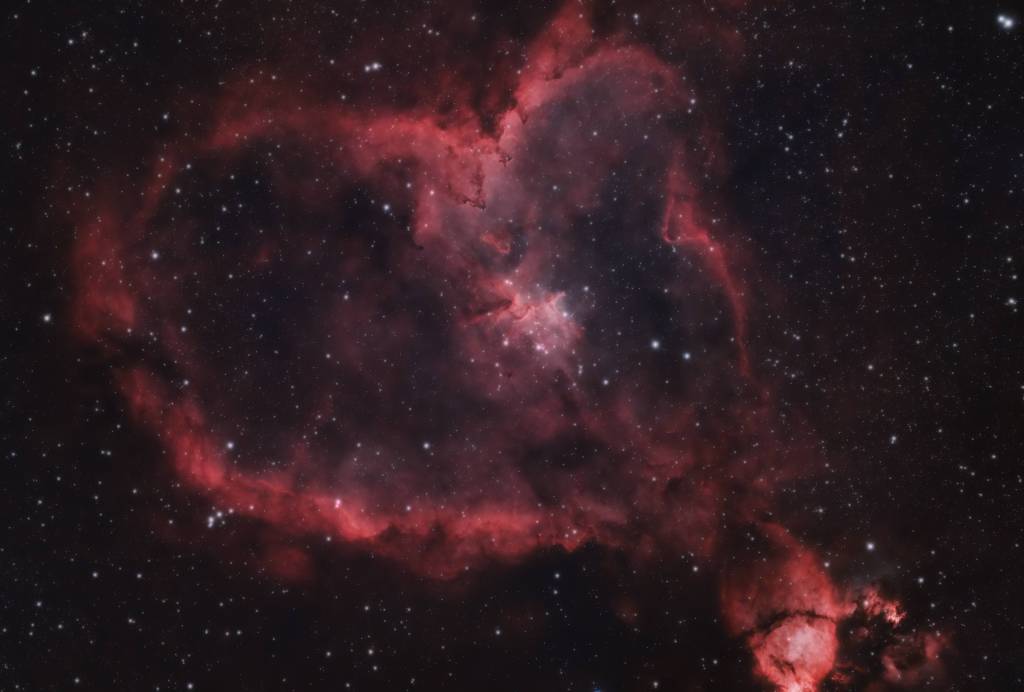
IC1805 – The Heart Nebula
This image is made from 18 hours of exposure data, collected using a William Optics Zennithstar 73 apochromatic refractor, an EQ6-R Pro equatorial mount, and an Optolong L-eNhance narrowband light pollution filter. I used the ASI 294 MC Pro dedicated one shot colour astronomy camera, and the imaging rig was controlled using ZWO’s ASIAIR Plus.
Exposure Length: 240 seconds
Number of Exposures: 270
Calibration Frames: Flats, Darks
Sensor Temperature: -20 °C
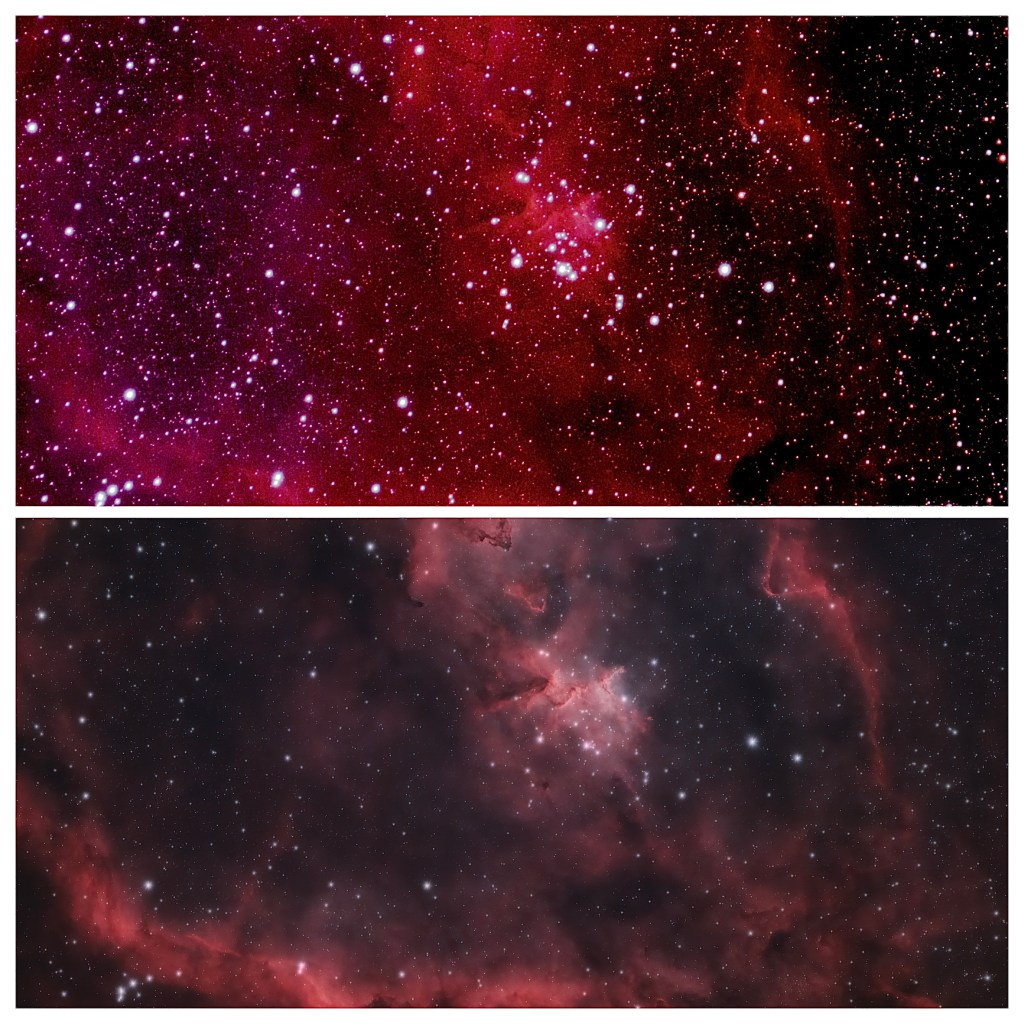
Attempt 1 vs Attempt 4
The above image shows a comparison between my first attempt at the Heart Nebula, along with my latest. Looking back, I now notice the bloated stars, over-darkened background, over-saturated colours and blurriness of the image. But in the moment, I was ecstatic with the result. Astrophotography comes with many frustrations, technical challenges and battles against the weather, but it will also humble you, demand your very best effort, commitment and passion. And eventually, you’ll look back and realise how far you’ve come.
For so many astronomers, the Heart Nebula is a reminder of the beauty and wonder of the universe. It is a testament to the power of nature and the incredible forces at work in the cosmos. Whether you are an amateur astronomer or just someone who appreciates the beauty of the night sky, the Heart Nebula is a sight that is sure to inspire and awe.
So the next time you find yourself gazing up at the stars, take a moment to look for the Heart Nebula. Allow yourself to be transported to a world of beauty and wonder, and remember that there is so much more to the universe than what meets the eye. The Heart Nebula is a reminder that the universe is full of surprises and that there is always something new and amazing to discover!
Astrophotography is a fascinating and rewarding hobby that lets you to capture stunning images of the night sky. Whether you’re an amateur astronomer or simply someone who enjoys stargazing, taking your first astro-photo is an unforgettable experience. The feeling of awe and wonder is something that will stay with you for the rest of your life. You’ll never look at the night sky the same way ever again.
In this blog post, we’ll discuss some tips and techniques to help you capture your first stunning astrophotography image.
The Equipment
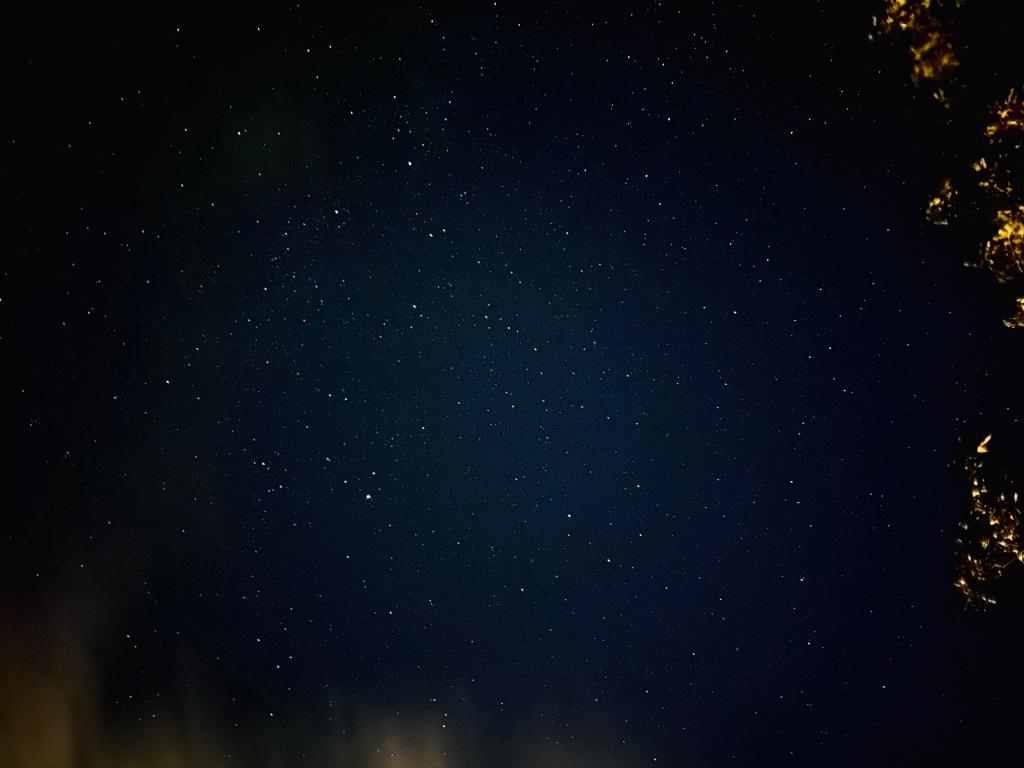
There is a misconception that you need to spend thousands on professional gear before you can start to capture wonderful photos of the universe. The reality is far from it. Below is an image of my first ever astro-photo. It was taken on an iPhone 12 Pro, using a cheap phone tripod and a 30 second exposure timer.
Starlights – iPhone 12 Pro – Single 30 second exposure
The image above was taken during August 2020. With my dad and brother, looking up at the sky, we could only make out 10-15 stars with the naked eye. I thought it would be interesting to capture the scene with the clouds drifting by, but when the exposure completed and the image displayed on the screen, I was absolutely blown away! This tiny smartphone camera was able to capture thousands of stars in a sky where I could only see a fraction of them. The camera was capturing details I was unable to see by myself. From that moment on, I was hooked! Although it’s tough to believe, astrophotography is more about how it makes us feel rather than the end result. The image is still important – but it’s about the emotions you feel whilst capturing and processing it!
Before you can start taking astrophotography images of deep sky objects, you’ll need to invest in some basic equipment. First and foremost, you’ll need a camera capable of taking long exposures. A DSLR or mirrorless camera is a good choice, as they allow you to adjust key settings like the aperture, shutter speed, and ISO. You’ll also need a sturdy tripod to keep your camera stable during long exposures, and a remote shutter release to minimize camera shake.
Choose the Right Location
Finding the right location for astrophotography isn’t as important as you might think. You’ll want to find a spot that is far away from city lights, as light pollution can interfere with your images. Look for a dark sky area where the stars are visible, and try to avoid areas with trees or other obstacles that may block your view of the sky. However, if you can’t, there’s no reason to worry. As long as you have a view of the sky, you can make use of light pollution filters to block out unwanted light from street lights and nearby cities. Every image I’ve captured has been right from my back garden at home.
Decide what you want to image
Once you’ve found the right location, it’s time to plan your session. For deep sky objects, you’ll want:
A focal length around 150mm or above. This allows you to zoom in and magnify deep sky objects
A star tracker. Because the Earth is moving, at longer focal lengths, stars will begin to streak across the image during long exposures. Star trackers move in the opposite direction of the Earth, keeping your camera locked onto the same point in the sky all night long, allowing for sharp images and pinpoint stars.
Lens heater – This wraps around the lens and keeps it warm, preventing condensation from forming throughout the night.
Intervalometer – This allows you to control the camera without touching the body, minimising vibrations.
Camera Settings
Configuring your camera is vital in making sure your exposures are correct. We want the sensor to collect plenty of light without washing out the image. You’ll want to set your camera to manual mode, and adjust the aperture, shutter speed, and ISO to capture the best possible image. For most deep sky objects, the following settings will be a great starting point:
Exposure time/Shutter speed: 120 seconds. This is long enough for the sensor to collect plenty of light, but short enough where any tracking errors in most star trackers should not be visible.
Aperture: f/2.8 – 4 – A wide aperture will maximise the light gathering ability of your lens
ISO: 800 – This one is subject to lots of controversy. Some prefer a higher gain, others lower. It often depends on what model of camera you’re using, but I’ve always preferred lower ISO settings as this helps reduce the overall grain and noise in the final image.
Polar Alignment
Polar alignment is extremely important in astrophotography because it allows your telescope to accurately track the apparent motion of the stars across the sky, resulting in clear and sharp images.
Your camera needs to be able to follow the rotation of the Earth so that the stars appear as pinpoints of light instead of blurry streaks. Although the star tracker will handle this for you, it still needs to be aligned with the rotational axis of the Earth. This is known as Polar Alignment – find out more here!
Framing your target
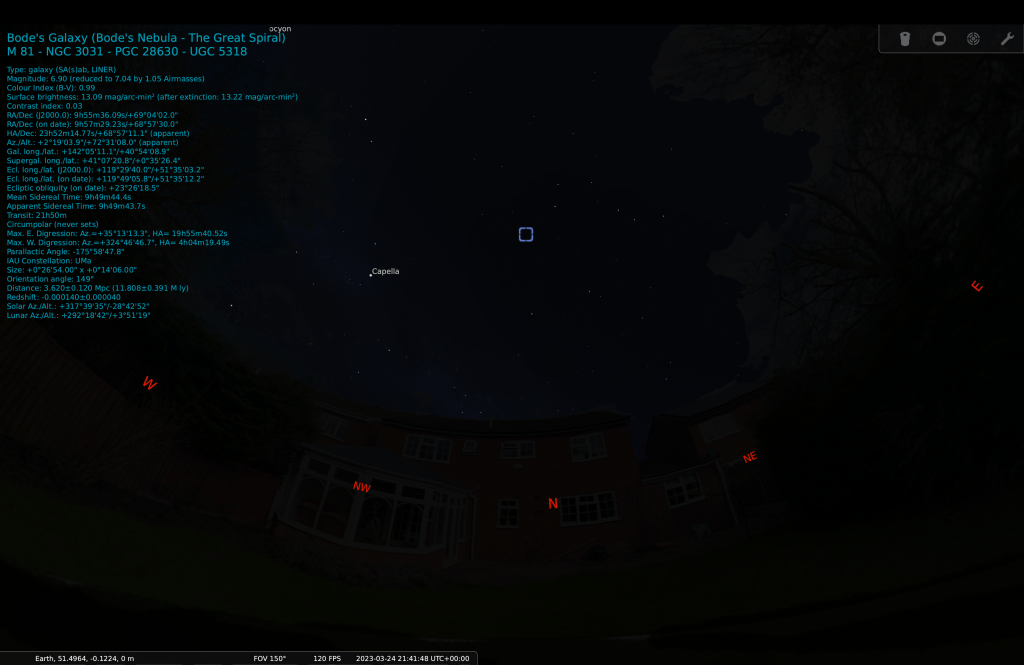
Astrophotograhy is no different to street, nature or portrait photography – all require preparation, planning, and framing. However unlike conventional photography where your subject is clearly visible, most deep sky objects are too far away to be seen by the naked eye, which makes framing a big challenge for beginners. Something I use to help with this is planetarium applications. These applications show you what will be in the night sky on a particular day and time. My favourite option is Stellarium, as it allows you to overlay your own garden or home to plan ahead for any obstructions. See below:
My home and garden overlayed in Stellarium
From the image above, I can clearly see what my target, Bodes Galaxy, will be high in the sky and would have cleared the roof of my house. It also shows me exactly where in the sky it will be!
Zooming in, Stellarium also provides the option to input the sensor size of your camera and focal length of your lens or telescope. From here, it will show you just how big the object will be in your image frame. You also have the option of rotating the frame to try different framing options!
Positioning your Camera
Once you know what framing you want to achieve, it’s time to point your camera at the right area of the sky! If you’re using a simple star tracker, you’ll need to do this manually. This can be challenging for those unfamiliar with star patterns, but, in short – you’ll need to look at the star patterns in Stellarium, and use those as a guide. You will have to position your camera, take a short test exposure, and keep re-positioning until you get the target in your field of view. However, if you’re using a mount that has go to functionality, it should be as simple as selecting the target in the hand controller, and the mount will automatically slew to the correct part of the sky!
Collecting your Sub-frames
Sub-exposures refer to the individual frames or images that are taken by a camera during a long exposure astrophotography session. Rather than taking a single long exposure, it’s better to take multiple shorter exposures, which are then stacked and combined to create the final image.
It also allows you to reduce noise and improve image quality. When taking long exposures, the camera’s sensor can become hot, which can introduce noise into the image. By taking several shorter exposures, the sensor has time to cool down between shots, reducing the amount of noise that appears in the final image.
Taking multiple sub-exposures makes it easier to capture faint details in the night sky. By taking multiple shorter exposures, astrophotographers can collect more light from distant objects like galaxies and nebulae. When these shorter exposures are combined, the faint details become more visible. They help to minimise the effects of tracking errors and satellite trails running across your frames.
Processing your Images
Once you’ve taken your sub-exposures, it’s time to stack them together. There are many different types of software available, however the most beginner friendly option (and it’s also very good..!) is DeepSkyStacker. The program will take your individual sub-exposures, and stack them all together by aligning the stars. You can also tell it so only stack the best 90% to ensure any images with blurry stars or clouds are excluded. DSS will then output a single TIFF file for you to process in the photo editing suite of your choice. Most use Adobe Photoshop or Pixinsight.
Taking your first astrophotography image can be a daunting experience, but one that is incredibly rewarding. There is nothing more satisfying than working hard to understand and use the equipment you have, and capture the Universe in a way you’ve never seen it before. By careful planning and taking your time, you can capture stunning images of the night sky that will amaze and inspire others. So get out there, and start exploring the wonders of the universe through your camera lens! Soon you’ll be ready to upgrade to something like this…!
As the weather begins to warm up and we head into Spring, astrophotographers eagerly anticipate the arrival of galaxy season. This is the wonderful time of year when the Earth faces away from Milky Way’s spiral arms and out into deep space, allowing a host of other galaxies to become visible to stargazers.
I don’t know about you, but the idea of photographing another galaxy full of countless stars and unknown worlds makes me feel very small (in a good way). This is one of the many amazing feelings of awe and wonder experienced by backyard amateur astronomers and photographers alike.
Galaxy season typically runs from March to May in the Northern Hemisphere. It is during this time that we get breathtaking views of the gems that deep space has to offer. Galaxy season is a great time for astrophotography. With a camera and tripod, you can capture stunning images of the far away galaxies – galaxies that are home to trillions of stars just like our own, and possibly countless other worlds and beings just like us.
Although galaxies are incredibly large, they are millions of light-years away, and so they require telescopes with a very long focal length to view and capture them. However even with a small refractor, we can still capture some stunning photographs of these other worlds. A very popular target during season is the galactic pair of Messier 81 and 82 – The Cigar and Bodes galaxies.
I captured the image above using a William Optics Zenithstar 73 apochromatic refractor, a one shot colour dedicated astronomy camera, and an Optolong L-Pro light pollution filter. At a modest focal length of 440mm, both galaxies can be seen floating effortlessly in a vast expanse of deep space, surrounded by an ocean of colourful stars, each one a possible Sun to some distant civilisation.
Perhaps the most famous target during galaxy season is the Andromeda Galaxy. With binoculars or a telescope, you can see its spiral arms and even some of its smaller companion galaxies. However, similarly above, using a camera, we can take several long exposure images of the galaxy and combine them together to improve the signal-to-noise ratio. This allows us to maximise the signal or light from the galaxy, whilst averaging out the background noise from the sky. The Andromeda galaxy is one of my favourite jewels in the night sky. Ever since I was a child, I dreamed of being able to take a photo of it, and in summer of 2022, I was able to capture the below image.
Messier 31 – The Andromeda Galaxy
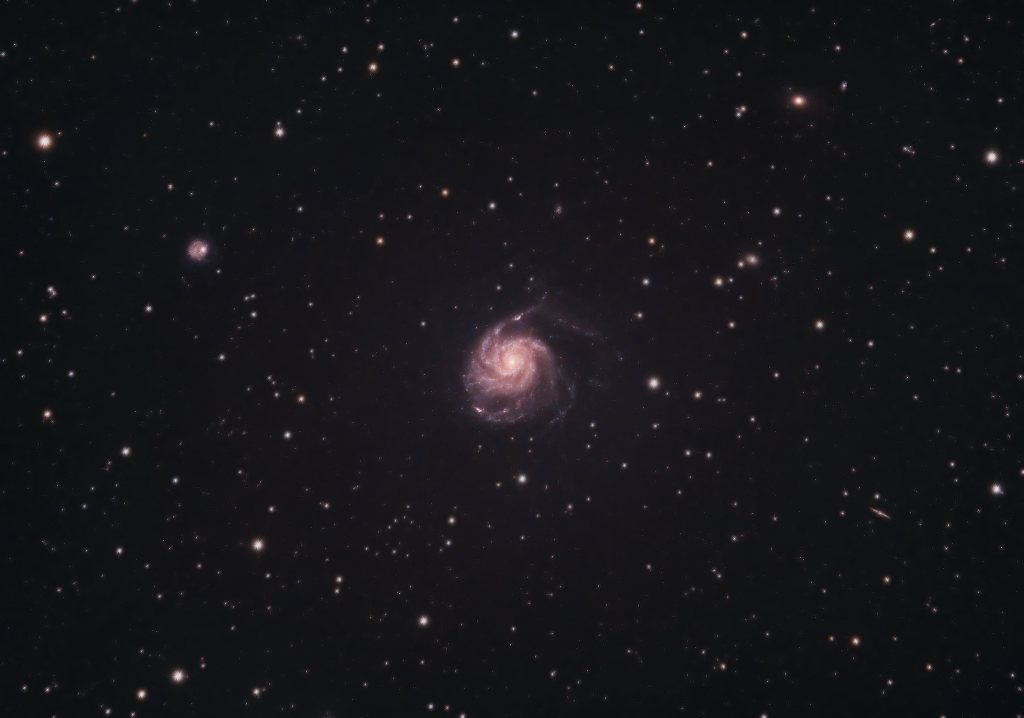
Another favourite of mine is the Pinwheel Galaxy. Located in the constellation Ursa Major, the Pinwheel galaxy is almost 21 million light-years away from Earth. Lying face-on, it provides us wonderful views of its complex spiral structure, and perfectly highlights the vastness and beauty of our cosmos.
Other popular targets include the Whirlpool Galaxy, located in the constellation Canes Venatici. This galaxy is notable for its striking spiral arms and the companion galaxy located just off its side. The Sombrero Galaxy, located in the constellation Virgo, is another favorite for its distinct shape and bright nucleus.
In addition to stargazing and astrophotography, there are many events and activities during galaxy season. Astronomy clubs and organizations often host star parties and observing sessions, where you can meet other astronomy enthusiasts and learn more about the night sky. There are also many online resources and apps that can help you identify and locate galaxies in the sky.
Galaxy season is a wonderful time for astronomy enthusiasts to observe and appreciate the beauty of our galaxy and beyond. Whether you’re stargazing, taking astrophotographs, or attending events, there are many ways to participate in this exciting time of year. So grab your telescope and head outside to explore the wonders of the universe.